Automatic Rules: Complete Guide
Automatic Rules are the engine behind TheOptimizer's automation capabilities. They allow you to convert your manual optimization strategies into logic that the system executes around the clock. Instead of constantly monitoring your campaigns to pause underperformers or scale winners, you can program the system to do it for you.
There are three core reasons to use rules:
- Free up your time. Automating repetitive tasks — pausing ads that don't convert, scaling budgets on winners — lets you and your team focus on higher-leverage work: creative testing, landing page improvements, new product ideas.
- 24/7 coverage. Your team can't be in front of a screen around the clock. A rule can catch a campaign going over budget at 3am, or scale a campaign that's hit its limit mid-night before it stops running.
- Eliminate human error. Manual optimization means checking numbers, clicking into campaigns, and entering values — all of which are error-prone. An automation does exactly what you define, every single time.
This guide walks you through everything you need to know: navigating the rules engine, understanding rule logic, and setting up your first automation.
In This Article
- Accessing and Navigating the Rules Engine
- Creating a Rule: Basic Settings
- Rule Logic: Conditions & Time Frames
- Rule Actions
- Scope and Filtering
- Scheduling & Frequency
- Notifications & Alerts
1. Accessing and Navigating the Rules Engine
To start working with automation, navigate to the Rules section of the platform.
How to Access:
- On the left-side navigation menu, locate the Automation section.
- Click on Rules.
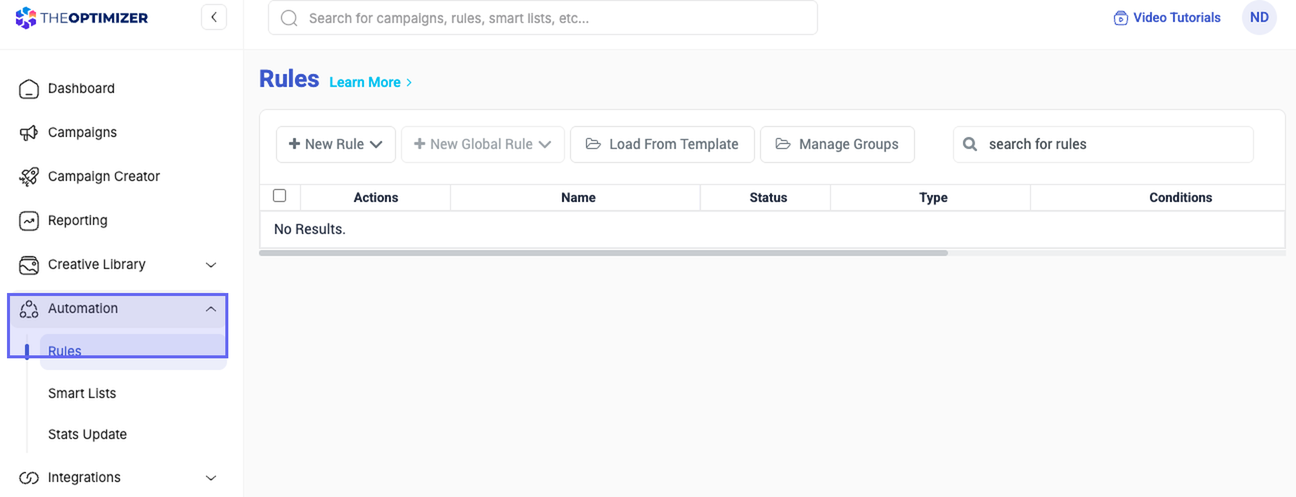
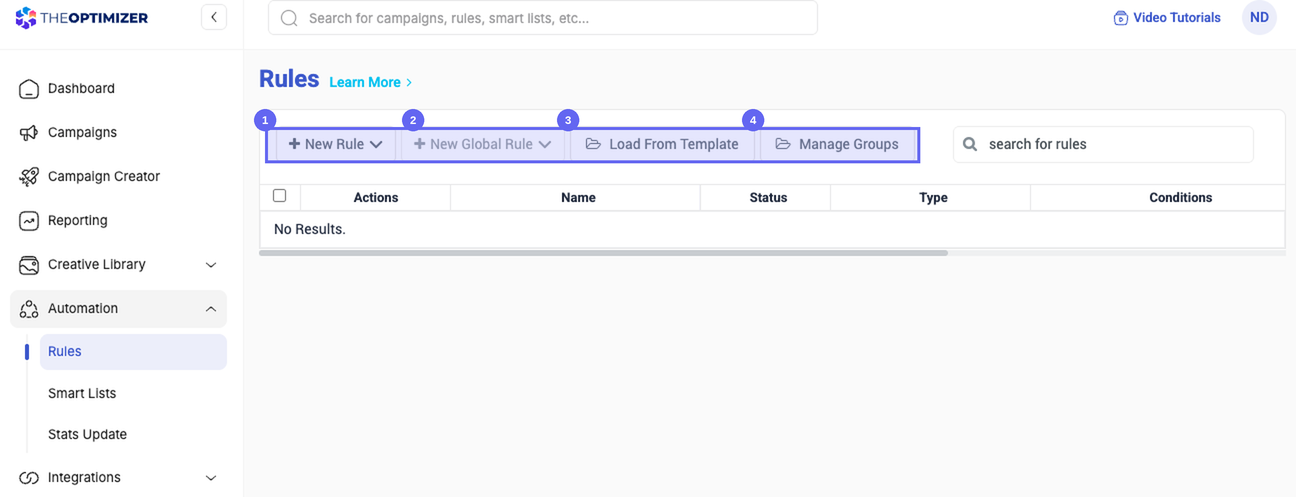
Once inside the Rules page, you will see a top menu bar with several key options.
The Top Menu Options
| Option | Description |
|---|---|
| New Rule (Standard) | Creates a rule that applies to specific campaigns you manually select. New campaigns launched later must be added manually — more on this below. |
| New Global Rule | Works identically to a standard rule in terms of logic, but applies to an entire Ad Account. Any new campaign launched inside the selected account automatically inherits the rule. |
| Load from Template | Opens a library of pre-built rule templates (e.g., "Stop-Loss," "Scaling," "Dayparting"). A great way to get started quickly — but always customize the default values to fit your specific needs. |
| Manage Groups | Lets you organize rules into folders. Beyond organization, groups let you assign a whole set of rules to a campaign at once — a big time-saver as your rule library grows. |
Standard Rules vs. Global Rules: Why It Matters
The most important practical difference between the two rule types is what happens when you launch a new campaign.
With a Standard Rule, you must manually open the rule and add every new campaign you create. If you forget, those new campaigns are completely unprotected — no automation applies to them.
With a Global Rule, you select an Ad Account instead of individual campaigns. Any new campaign you launch inside that account is automatically covered by the rule from day one, with no extra steps required.
💡 Recommendation: For stop-loss and scaling rules that you want applied consistently across all your campaigns, prefer Global Rules. Reserve Standard Rules for logic that should only apply to a specific, curated subset of campaigns.
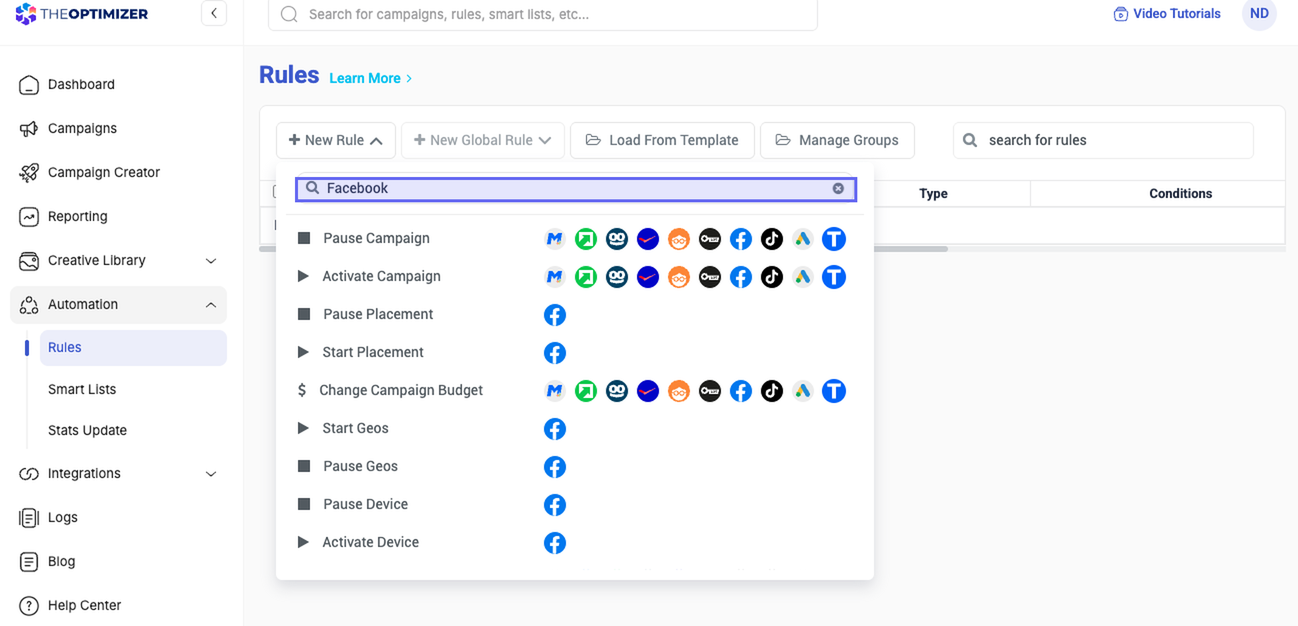
Finding the Right Rule for Your Traffic Source
When you click New Rule, the system loads all available rule types for every ad network you have connected. If you have Facebook, TikTok, and Taboola connected, you'll see rules for all three in one list.
The fastest ways to find what you need:
- Search by network name — Type "Facebook" in the search bar to filter only rules available for Facebook.
- Search by level — Type "ad" to see all ad-level rules, "campaign" for campaign-level rules, etc.
- Read the icons — Each rule name shows the logos of the ad networks that support it. A rule showing all your network logos means it works across all of them.
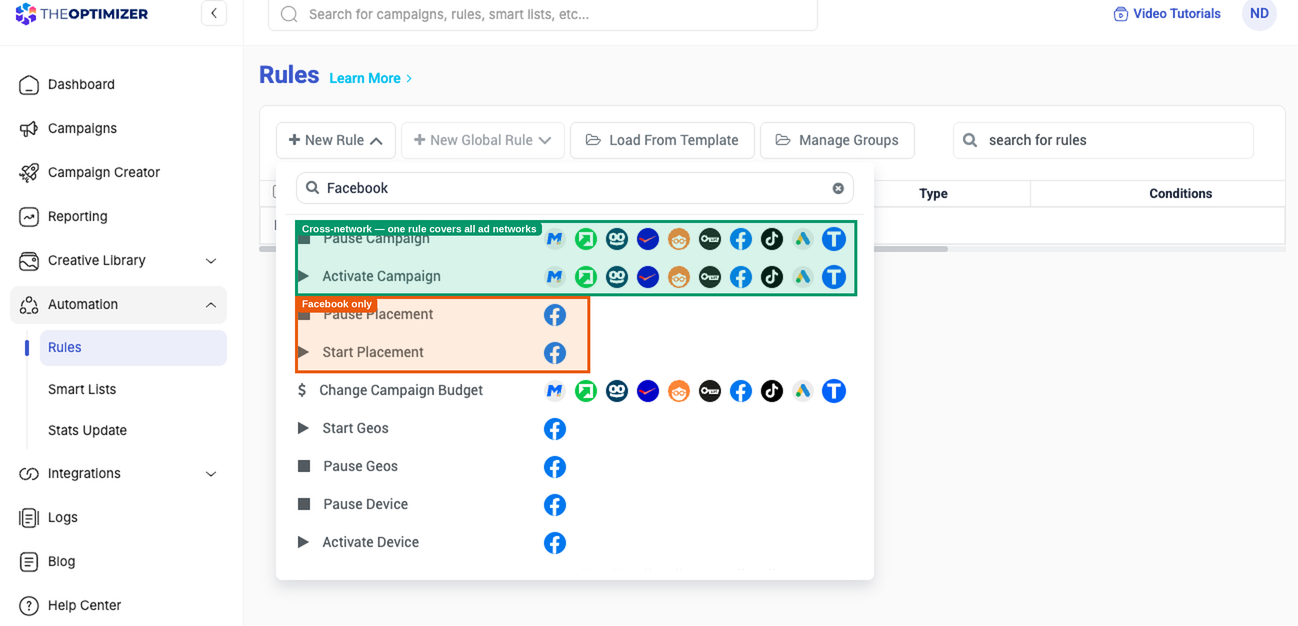
ℹ️ Cross-network rules: Rules supported by multiple networks can be applied to campaigns from different ad networks within a single rule. For example, if your Pause Campaign logic is the same for Facebook and TikTok, you can create one rule and add campaigns from both networks to it — rather than maintaining two separate rules.
Platform Terminology: Widget & Content
TheOptimizer uses some terms interchangeably with native advertising terminology. If you're running on native networks like Taboola or Outbrain, you'll encounter these throughout the platform:
| Platform term | What it means |
|---|---|
| Widget | A site (on Taboola) or publisher (on Outbrain). The placement level below the ad. |
| Content | An ad or creative. "Content rules" are ad-level rules. |
2. Creating a Rule: Basic Settings
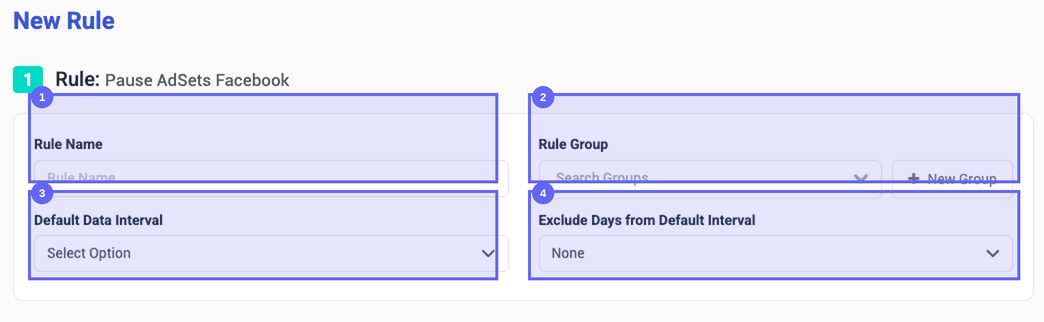
Click New Rule, select your rule type (e.g., "Pause Ads – Facebook"), and you'll enter the rule builder. The first section is Basic Settings.
Key Configuration Steps
- Rule Name — Use a name that describes the logic, not just the type.
Pause Ads – Spend > $50 & 0 Convtells you everything at a glance;Rule 1tells you nothing. As your rule library grows, self-explanatory names save a lot of scrolling. - Rule Group — (Optional) Assign the rule to a group. Beyond keeping your dashboard tidy, groups let you bulk-assign rules to campaigns later without selecting them one by one.
- Default Data Interval — The time window the system looks at when evaluating all conditions. Options range from
TodayandYesterdaytoLast 3 Days,Last 7 Days, all the way toLast 90 Days. Every condition in the rule will use this interval unless you override it individually (see Section 3). - Exclude Days from Default Interval — Removes specific recent days from the evaluation window. For example, if your revenue data arrives with a 24-hour delay (common in Search Arbitrage), excluding
Todayprevents the rule from making decisions based on spend with no corresponding revenue yet. You can exclude up to the last 3 days.
⚠️ On templates: If you create a rule from a template, always review and adjust the default values before saving. Template values are placeholders to get you started — they're almost never the right numbers for your specific account and offers.
3. Rule Logic: Conditions & Time Frames
This is the "brain" of your automation. Conditions define the exact criteria that must all be true for the rule to execute. Each condition has three parts: a Metric, an Operator, and a Value.
Adding Conditions
Click Add Condition (or the + button) and configure three parts:
- Select Metric — Use the search bar in the dropdown to find metrics quickly.
- Select Operator — Greater Than, Less Than, Greater or Equal, etc.
- Enter Value — The number you're comparing against.
Example logic:
IF Amount Spent > 50 AND Conversions ≤ 0
Understanding Metric Categories
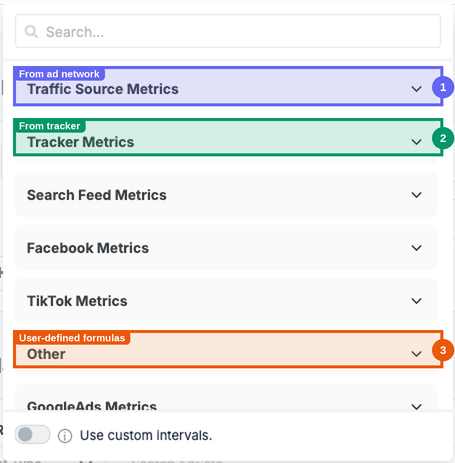
When browsing metrics in the dropdown, they are organized into three categories:
| Category | Source |
|---|---|
| Traffic Source Metrics | Data pulled directly from your ad network (e.g., Amount Spent, Impressions, Clicks from Facebook or TikTok). |
| Tracker Metrics | Data from your connected tracking platform (e.g., conversions, revenue, EPC from Voluum, Binom, etc.). |
| Custom Metrics | Metrics you define yourself by writing a formula inside TheOptimizer. Useful for creating KPIs that combine data from multiple sources. |
Duplicating a Condition
When you need two conditions that are very similar — for example, checking that spend is both greater than $50 and less than $200 — use the duplicate button on the right side of any condition row. This clones the condition so you only need to change the operator or value, rather than rebuilding from scratch.
Advanced Logic: Percentage Comparisons
Instead of comparing a metric to a fixed number, you can compare it to another metric. Click the $ icon next to the value field to switch modes:
| Mode | Description |
|---|---|
| $ (Fixed Value) | Default. Compare against a specific number (e.g., Spend > $50). |
| % of Campaign | Compare against a campaign-level metric. Example: "Spend is greater than 20% of Campaign Daily Budget." |
| % of | Compare against another metric at the same level. Example: "Spend is greater than 50% of Revenue" — an ROI threshold without a fixed number. |

Custom Time Frames (Per Condition)
All conditions use the Default Data Interval by default. But you can override this on a per-condition basis — allowing you to build rules that look at different time windows simultaneously.
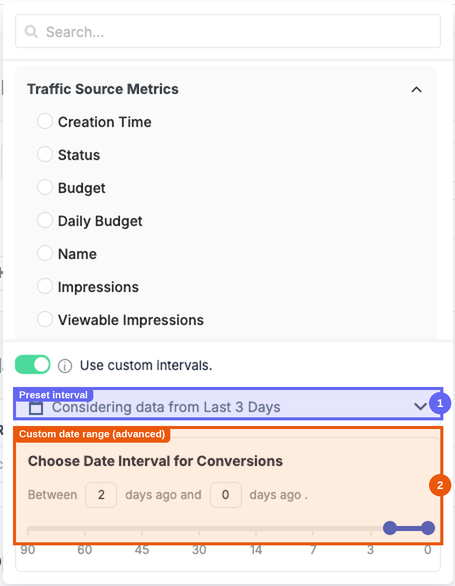
To do this, toggle Use Custom Interval inside the condition row and select a time range. The condition will then display a small label showing its custom interval.
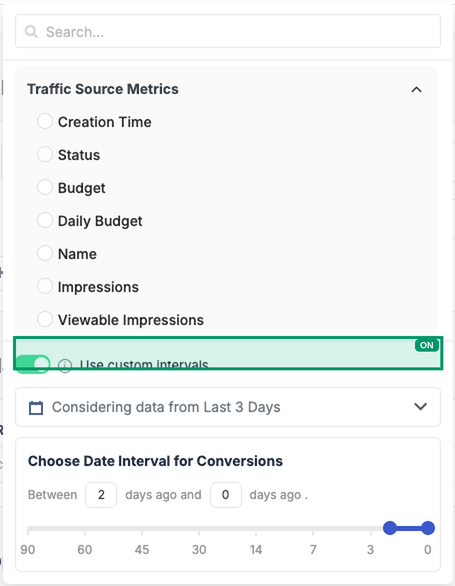
Beyond the standard presets, you can also define fully custom date ranges — for example, "between 10 days ago and 6 days ago" — for advanced use cases where you need to analyze performance in a very specific historical window.
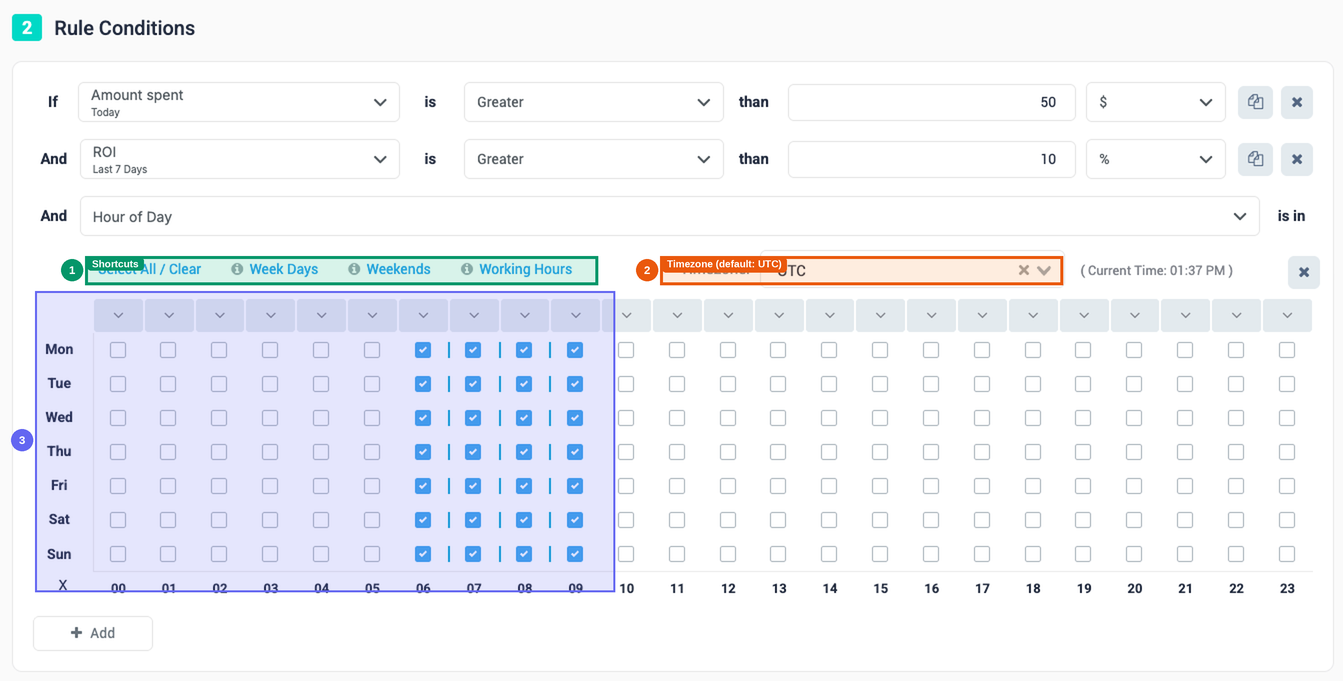
💡 Example: Mixed time frames — Check whether an ad has spent money Today, while also checking its ROI over the Last 7 Days. Set the global interval to Last 7 Days, then give the Spend condition a custom interval of Today.
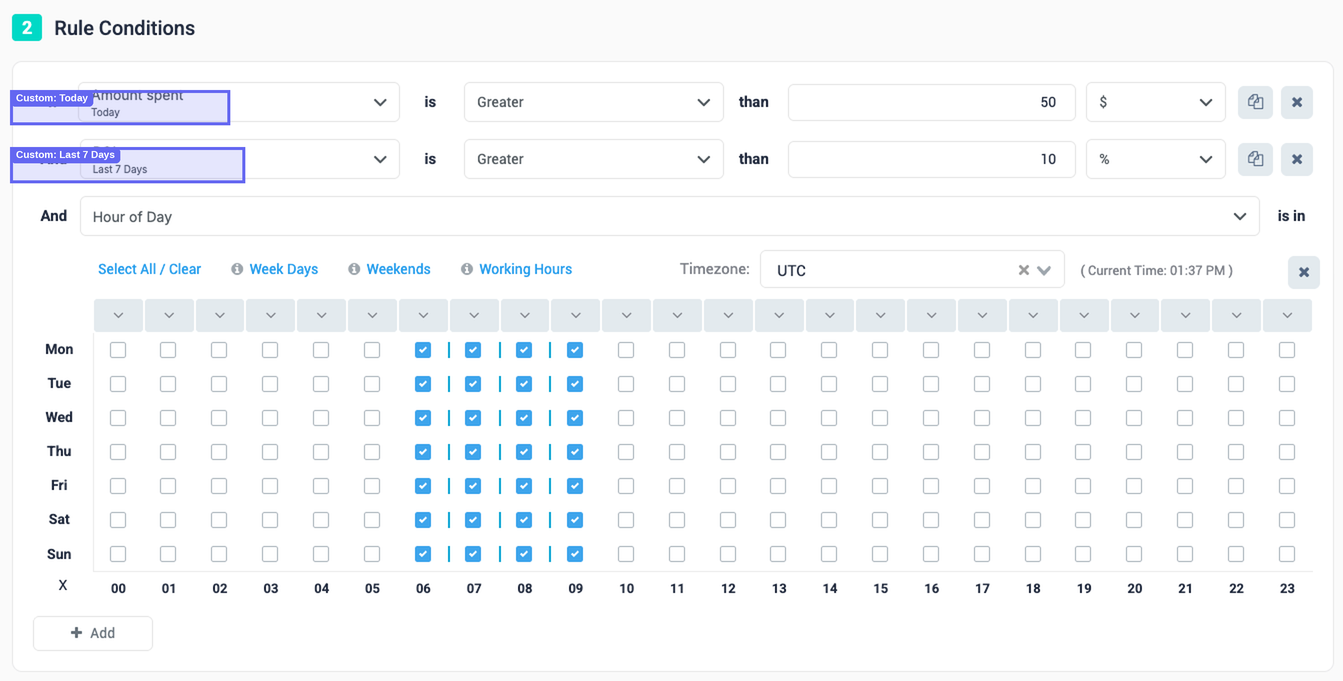
Hour of Day Condition
The Hour of Day condition restricts when a rule is allowed to act, independently of whether the other conditions are met. If you only select Monday 9am–5pm, the rule will not take any action outside those hours — even if all other conditions are true.
- Add the Hour of Day metric (under the "Other" category, or search for it).
- A grid appears with days on the vertical axis and hours on the horizontal axis.
- Click individual cells, or use the shortcuts at the top: Weekdays, Weekends, Working Hours, Select All, and Clear All. You can also click an hour header to select that hour across all days, or click a day label to select all hours for that day.
- Set the Timezone — defaults to UTC. Change this if your team or traffic operates in a specific timezone.
ℹ️ Pairing Hour of Day with Scheduling: If you use this condition, set the rule's execution frequency (Section 6) to Every 1 Hour. Running it every 10 minutes is redundant and clutters your execution logs.
4. Rule Actions
This section defines what the rule does when all conditions are met. There are four main action types.
1. Status Actions (Pause / Activate)
The simplest action type. When conditions are met, the entity (ad, adset, campaign) is paused or activated. No further configuration is needed — the action is fully defined by the rule type you selected.
2. Budget & Bid Adjustments
For change-budget and change-bid rule types, configure the action in the Rule Action section:
| Action | Description |
|---|---|
| Set To | Forces the budget or bid to an exact value — a fixed number or a percentage of another metric. |
| Increase By | Adds to the current value by a fixed amount or a percentage. Useful for incremental scaling. |
| Decrease By | Subtracts from the current value by a fixed amount or a percentage. Useful for gradually pulling back on underperformers. |
The same three options apply to both budget and bid adjustments, with the same percentage comparison capabilities described in Section 3.
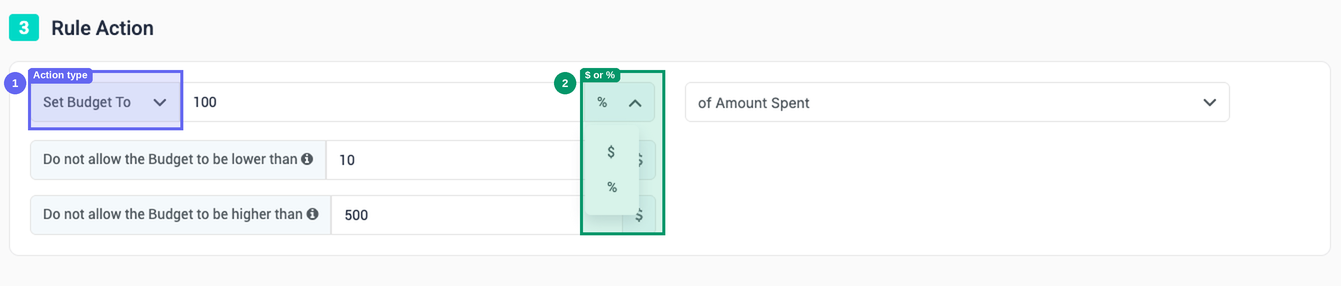
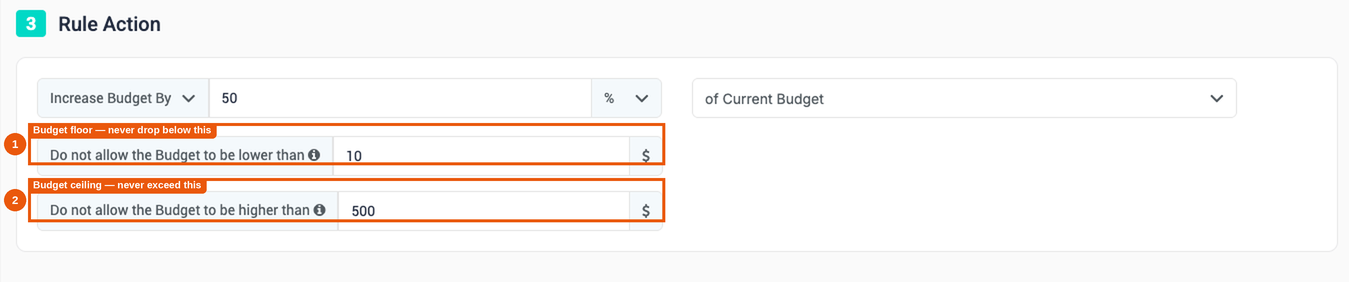
Budget Safety Rails: Floor & Ceiling
When using Increase By or Decrease By, you can set a minimum and maximum budget value to prevent the rule from adjusting beyond safe limits:
- Min Budget (Floor) — The rule will never reduce the budget below this value, even if the decrease amount would go lower.
- Max Budget (Ceiling) — The rule will never increase the budget above this value, even if the increase amount would go higher.
These caps are optional but strongly recommended for scaling rules — they ensure a single rule execution can't accidentally push a budget to an extreme if something unexpected happens.
3. Cloning Actions
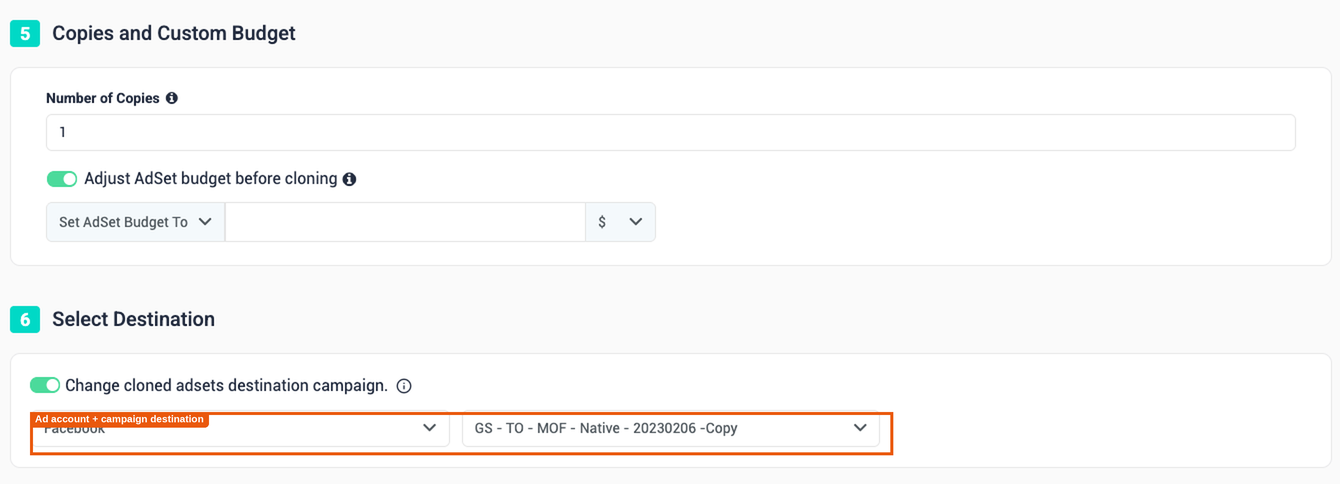
Cloning rules automatically duplicate a campaign, adset, or ad when conditions are met. Two additional fields appear:
- Number of Copies — How many clones to create each time the rule fires.
- Adjust budget before cloning — Optionally set the budget on the cloned copy to a specific value at creation time, rather than inheriting the original's current budget.
- Destination — By default, clones land in the same campaign. Enable Change Cloned Ad Destination to redirect them to a specific adset, campaign, or even a different ad account.
4. Dayparting
Dayparting rules let you schedule exactly when a campaign runs. Important: dayparting is only available at the campaign level — it cannot be applied to ads or adsets.
The rule combines a grid (where you select hours and days) with an action:
| Action | Description |
|---|---|
| Pause on selected hours, otherwise do nothing | Pauses during selected hours only. Outside those hours, the campaign is left in its current state. |
| Pause on selected hours, otherwise start | The most commonly used option. Pauses during selected hours and actively ensures the campaign is running at all other times. |
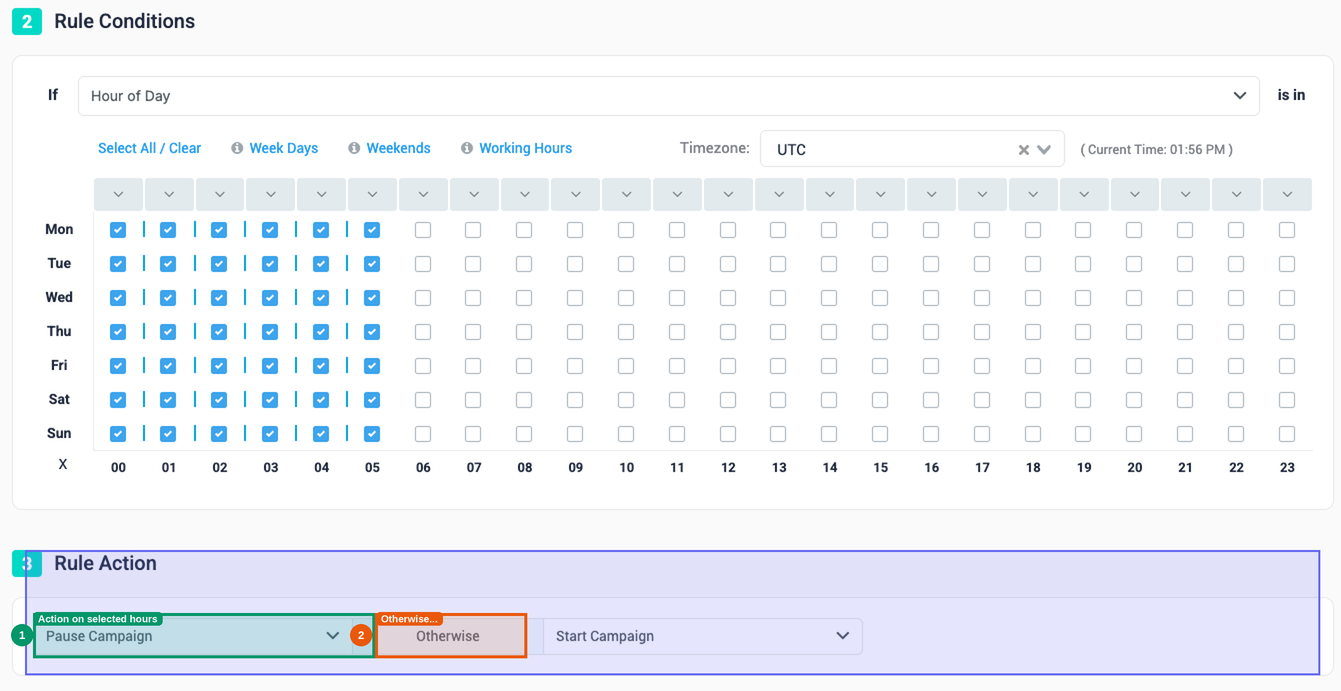
💡 Example: Select all hours on Saturday and Sunday, then choose "Pause on selected hours, otherwise start." The campaign will automatically pause on Friday night and resume Monday morning — no manual intervention needed.
5. Scope and Filtering
Once the logic and action are defined, you control exactly which entities the rule monitors and acts on.
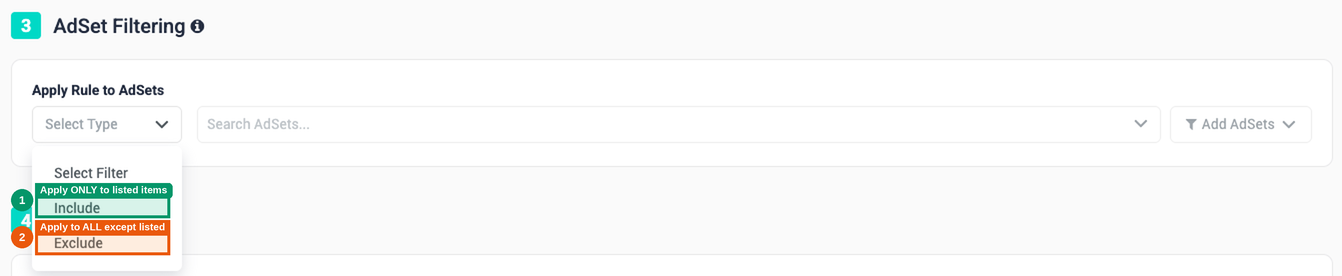
Filtering: Include or Exclude Specific Items
The filter section lets you narrow or exclude specific items within your selected campaigns. The two modes work differently:
| Mode | Behavior |
|---|---|
| Include | Overrides the campaign selection scope. Even if you have 100 campaigns selected, the rule will only act on the specific items you list here. |
| Exclude | The rule applies to everything across all selected campaigns, except the items you list. Use this to protect specific ads (e.g., those with "DO NOT TOUCH" in the name) while automating everything else. |
You can populate either list by searching for specific items manually, or by using bulk filtering to select all items matching a naming pattern at once.
Select Campaigns
Every rule — regardless of whether it acts on ads, adsets, or campaigns — requires you to specify which campaigns it monitors. The rule evaluates entities within those campaigns only.
- Manual Selection — Search for specific campaigns and check them one by one.
- Smart Filtering — Use the filter sidebar to auto-select all campaigns matching a naming pattern (e.g., all campaigns containing "US_2026").

⚠️ Standard Rules: don't forget new campaigns. A campaign not in this list is completely invisible to the rule. Every time you launch a new campaign with a Standard Rule, you must come back and add it here. This is the key reason to prefer Global Rules for broad automations.
ℹ️ Note: If you are creating a Global Rule, this section asks you to select Ad Accounts instead of individual campaigns.
6. Scheduling & Frequency
This setting controls how often TheOptimizer evaluates your conditions and potentially fires the rule.
| Frequency | Best For |
|---|---|
| Every 10 min – Every 1 Hour | Stop-loss rules where you need to react quickly to bad performance. |
| As Soon as Conditions Are Met | Time-sensitive actions. The system continuously checks and fires the moment all conditions become true. |
| Once Daily / Daily at Specific Time | Budget resets or full-day performance reviews. You can set the exact time (e.g., 8:00am UTC). |
| Weekly | Rules that only need to run once a week — e.g., reviewing and adjusting budgets every Monday morning. |

ℹ️ Using Hour of Day? Use Every 1 Hour. If your rule includes an Hour of Day condition, running it every 10 minutes is redundant — the rule won't act outside the specified hours regardless. Set it to Every 1 Hour to keep execution logs clean and readable.
7. Notifications & Alerts
The final step controls whether the rule acts, notifies you, or both.
Execution Modes
| Mode | Description |
|---|---|
| Execute & Alert | The rule makes the change and sends you a notification listing all items that triggered it. |
| Execute | The rule makes the change silently. No notification sent. Use for well-established automations you trust completely. |
| Alert Only | Sends a notification but makes no changes whatsoever. The rule becomes a monitoring and alerting tool. |

💡 How to build a pure monitoring rule (Alert Only): You can turn any rule type into a monitoring-only rule by selecting Alert Only. The rule type itself doesn't matter — what matters is the level (campaign, ad, adset) and the conditions. Create a "Pause Ads" rule, define your conditions, set it to Alert Only, and you'll be notified when matches occur without anything actually being paused.
ℹ️ Test new rules first. Before activating a new rule on all campaigns or ad accounts, test it with 1 or 2 campaigns first. Review the changes to confirm it is working as expected, and only then proceed with adding all the campaigns or ad accounts.
Notification Channels
Notifications can be sent via Email, Slack, or Telegram. You can configure multiple accounts for each — for example, alert multiple Slack channels or multiple team members by email simultaneously.
To configure channels, go to Profile icon → Settings → Notifications tab. Channels must be set up there before they can be selected inside a rule.

Run on Paused Campaigns
By default, rules only evaluate entities within active campaigns. Paused campaigns are completely invisible to the rule — this is intentional, as in most cases you don't want automations touching campaigns you've deliberately stopped.
Toggle Run on Paused Campaigns to ON only when you specifically need a rule to monitor paused entities — for example, a rule that reactivates an ad if late conversions arrive after it was paused.

TheOptimizer Help Center · Automation › Rules