Facebook Mass Campaign Launcher
The Facebook Campaign Creator is TheOptimizer's interactive launcher for building and publishing Facebook ad campaigns in bulk. It mirrors the flow you already know from Facebook Ads Manager — Campaign → Ad Set → Ad — but adds powerful features on top that which make it possible to generate, upload, and launch at a scale that simply is not sustainable to do manually using the Ads Manager.
This guide covers everything from creating a simple campaign to generating hundreds of variations and launching them across multiple ad accounts in a single session.
In This Article
- Main Use Cases
- Campaign Launcher vs Facebook Ad Manager
- Getting Started - Overview
- Creating a Simple Campaign
- Generating Variations
- Multi-Ad Account Launch
- Create Ads Using Existing Posts
- Upload New Ads or Ad Sets to an Existing Campaign
- Dynamic Naming Templates
- Save Your Work as a Template & Reuse
- Ad Automation and Review
1. Main Use Cases
Here are the most common bulk campaign launch scenarios the Facebook Campaign Creator is built to handle:
- Upload a group of creatives, each in its own campaign with its own budget — automatically create a separate campaign and ad set for each uploaded creative, achieving full isolation per creative so Facebook cannot bias delivery toward a single ad.
- Upload a group of creatives, each in its own ad set under one campaign — automatically create a separate adset for each uploaded creative, while sharing a single campaign-level budget.
- Test the same creatives across multiple audiences and budgets — e.g., three audiences × three budgets = nine ad set variations, all generated from a single base ad set.
- Launch the same campaign structure across multiple ad accounts at once — diversify delivery, take advantage of separate learning phases per account, or reduce Facebook's initial randomness.
- Group creatives into batches — e.g., five creatives per ad set for rotation testing, instead of one creative per ad set.
- Launch a full campaign structure from a saved template with new creatives — swap in fresh assets and publish in minutes instead of rebuilding from scratch every time.
- Attach automation rules at launch time — campaigns go live with stop-loss, budget scaling, and other rules already active from the first impression.
2. Campaign Launcher vs Facebook Ad Manager
The Campaign Creator follows the same campaign → ad set → ad flow you already know from Facebook Ads Manager. The difference is in what you can do on top of that flow. Here are the features available in the Campaign Launcher that you will not find in the native Ad Manager:
Groups & Variations — Define multiple values for any targeting section (budgets, audiences, placements, pages, creatives) and the system automatically generates a separate variation for all group permutations. Example: Three budget groups × three audience groups = nine ad set variations, created instantly — no manual duplication.
Campaign "Restructuring" — Build a simple campaign with all your creatives, then with a single toggle, "explode" it into one campaign per creative, one ad set per creative, or any distribution you need. Upload once, reshape the structure in seconds.
Multi-Ad Account Launch — Duplicate your entire campaign structure (including all variations and settings), assign a different ad account to each copy, and publish everything together in one go. No need to rebuild the same campaigns from scratch in each account.
Reusable Templates — Save your full configuration as a template: campaign settings, ad set setup, ads, variation groups, auto-explode settings, multi-account copies, naming templates, and automation assignments. Load it next time and launch with minimal changes.
Creative Library Integration — Browse all images and videos from your active campaigns across all connected accounts, sorted by performance metrics (spend, EPC, usage). Filter by Creative Library tags to pull in pre-organised asset collections instead of uploading from scratch.
Automation at Launch — Attach your existing TheOptimizer automation rules to campaigns before they go live. Rules start evaluating from the first impression — no gap between launch and automation.
Dynamic Naming Templates — Auto-generate campaign, ad set, and ad names using placeholders for targeting settings, budgets, group names, nested names from lower levels, and incremental indexes. Keep naming clean across hundreds of variations.
AI Creative Enhancement — Generate new image variations directly inside the launcher using built-in AI image enhancement, powered by prompts or example images.
Bulk Placement Customization — Assign different creatives to specific placements (e.g., a different crop for Stories) across all ads at once, instead of customising one ad at a time.
3. Getting Started — Overview
To open the Facebook Campaign Creator, go to Campaign Creator in the left-hand menu and click the Facebook card. This opens the launcher in a full-screen dialog.
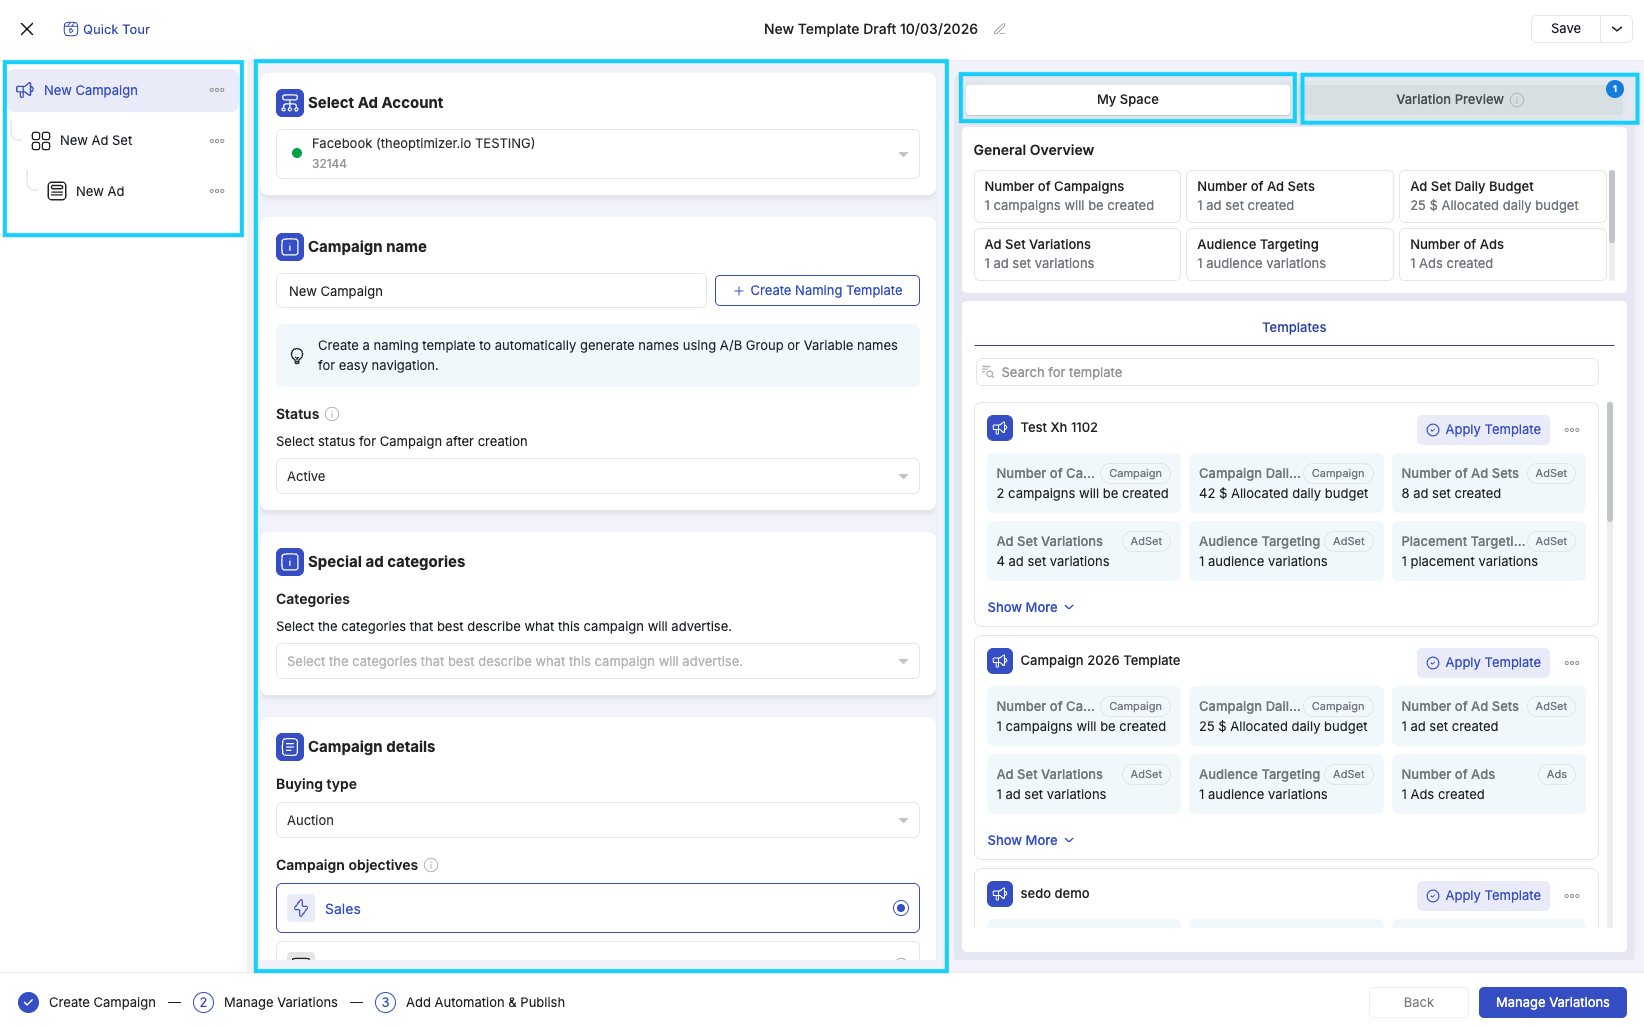
The interface has three panels:
Left panel — Campaign tree. A tree structure showing your campaign hierarchy: Campaign → Ad Set → Ad. Click any level to navigate to its settings. Use the three-dot menu (⋯) on any item to duplicate, create new, or rename.
Centre panel — Settings. This is where you configure everything for the currently selected level. The options mirror what you see in Facebook Ads Manager — campaign objective, budget, audience targeting, placements, creatives, and so on.
Right panel — My Space & Variation Preview. Two tabs:
- My Space — contextual helpers that change based on which level you are on. At the campaign level you see saved templates. At the ad set level you see recently used targeting configurations you can apply with one click. At the ad level you see your most active recent ads that you can reuse.
- Variation Preview — a live counter showing how many campaigns, ad sets, and ads will be created based on your current configuration, including any groups and auto-explode settings you have applied.
At the bottom of the screen, a progress bar shows the three main steps: Create Campaign → Manage Variations → Add Automation & Publish.
4. Creating a Simple Campaign
This section walks through creating a straightforward campaign with one ad set and multiple ads — no variations, no bulk uploading. This is the base from which all advanced features build.
Campaign Level
Click on the campaign in the left panel tree. Configure:
- Ad Account — select the Facebook ad account to create the campaign in
- Campaign Name — give the campaign a name (or use a dynamic naming template — see Section 7)
- Status — choose whether the campaign is uploaded as Active or Paused
- Special Ad Categories — select if applicable (e.g., Housing, Credit, Employment)
- Buying Type — Auction (the only type currently supported)
- Campaign Objective — Sales, Traffic, Leads, or Engagement
- Advantage Campaign Budget — toggle on to set budget at the campaign level. If enabled, configure the daily budget and campaign bid strategy (Highest Volume, Cost Per Result Goal, Bid Cap, or ROAS Goal)
💡 Tip: Upload campaigns as Paused if your team uses a two-step workflow where one person prepares campaigns and a reviewer activates them after QA.
💡 Tip: To start from a previously saved template, first locate the template on the right panel, and then click Apply.
Ad Set Level
Click on the Ad Set in the left panel tree and configure:
- Ad Set Name — name the ad set (or use a naming template)
- Conversions Location — Website, App, Website and App, or Calls
- Performance Goal — e.g., Maximize Number of Conversions, Maximize Value of Conversions
- Pixel — select the Facebook pixel to use for optimisation
- Conversion Event — select the conversion event to optimise toward
- Budget & Schedule — if you did not enable Advantage Campaign Budget at the campaign level, set the ad set budget here (daily or lifetime) along with start/end dates
- Audience — configure locations, age range, gender, languages, and optionally select a saved Custom Audience from Facebook
ℹ️ Note: TheOptimizer does not currently support creating Custom Audiences. If you work with custom or lookalike audiences, create them in Facebook Ads Manager first — they will then appear in the audience selector here.
- Beneficiary — enter the beneficiary for ad transparency. If left blank, TheOptimizer uses the default beneficiary from your ad account settings
- Placements — choose Advantage+ Placements (recommended by Facebook) or Manual Placements to select specific platforms, positions, and devices
💡Targeting suggestions. On the right panel under My Space, you will see a list of your most frequently used targeting configurations with an Apply button next to each. If a previous targeting setup matches what you need, one click applies it — no need to reconfigure locations, age, gender, and placements from scratch.
Ad Level
Click on the ad in the left panel tree. Configure:
- Ad Name — name the ad (or use a naming template)
- Status — Active or Paused
- Identity — select the Facebook Page and Instagram Account to run ads from
- Ad Format — Single Image or Video (Flexible Ads and Carousel support coming soon)
Uploading media. Click Add Media → Add Images or Add Videos. This opens the media browser where you can:
- Browse existing creatives — TheOptimizer collects and displays all images and videos from your active campaigns across all connected Facebook accounts. Sort by newest, oldest, highest spend, highest EPC, most used, or least used. Filter by Creative Library tags.
- Upload new media — click the Upload button to add new images or videos directly.
💡 Tip - Creative Library: For the best workflow, upload and tag your creatives in the Creative Library first, then come back to the Campaign Creator and filter by tag. This is especially useful when your creative team and media buying team are separate — creatives upload and tag assets, media buyers pull them in by tag.
Each uploaded image (or video) generates one ad. If you upload five images, five ads are created — you will see the count update immediately in the Variation Preview panel.
Per-creative options:
- Enhance with AI — use the built-in AI image enhancement to generate a new version of any image by providing a prompt or example images
- Customize by Placement — assign a different image for specific placements (e.g., a different crop for Instagram Stories). You can do this per-image or use the Bulk Placement Customization at the bottom of the media section to apply placement overrides across all ads at once
Ad copy and destination:
- Primary Text — add one or more variations
- Headline — add one or more variations
- Description — add one or more variations (each can be AI-generated for ideas)
- Call to Action — select from available options (Learn More, Shop Now, etc.)
- Destination URL — the landing page for the ad
- Pixel — select the tracking pixel for this ad
- URL Parameters — add tracking parameters for third-party trackers
5. Generating Variations
The variation generation system is what makes the Facebook Campaign Creator fundamentally different from Facebook Ads Manager. Instead of manually creating every campaign, ad set, and ad, you use one (or a combination) of three mechanisms to generate your full structure from a simple starting point.
Using Groups
Groups let you define multiple values for a targeting section, and the system generates a variation for each group automatically.
In several sections across the campaign, ad set, and ad levels, you will see a Group Card — a row starting with one default group and a + button to add more. Each group you create represents a separate variation of the campaign, ad set or ad, depending on which level you are.
When you add a second group, the system automatically generates an additional variation of the entity you are working on. Click on each group tab to customise its settings independently. For example, if you are on the ad set level and create two audience groups — one targeting the US and one targeting the UK — TheOptimizer will produce two ad set variations, identical in every way except their audience targeting.
Managing groups. Click the three-dot menu (⋯) on any group to:
- Rename — give the group a meaningful name (e.g., "US Audience" or "Budget $50"). Group names can be used in dynamic naming templates (Section 7)
- Clone — duplicate this group's settings into a new group
- Clone Bulk — duplicate the group multiple times at once
- Delete — remove the group
Where groups are available:
| Level | Section | What varies between groups |
|---|---|---|
| Campaign | Advantage Campaign Budget | Daily budget, bid strategy |
| Ad Set | Budget & Schedule | Daily/lifetime budget, schedule |
| Ad Set | Audience Controls | Locations, age, gender, languages, custom audiences |
| Ad Set | Placements | Platform and placement selections |
| Ad | Identity | Facebook Page, Instagram Account |
| Ad | Ad Creative | Media, primary text, headlines, descriptions, CTAs |
How permutations are calculated. Groups at the same level multiply with each other. If you create three budget groups and three audience groups at the ad set level, the system generates 3 × 3 = 9 ad set variations. Add two placement groups and you get 3 × 3 × 2 = 18 ad set variations.
The Variation Preview panel on the right updates in real time as you add groups. Always check this counter before proceeding.
⚠️ Important: Permutations can grow quickly. Three groups in three different sections produces 27 variations. Make sure the total is intentional before moving forward.
Using "Campaign Restructuring"
Campaign Restructuring is the feature that lets you take a simple campaign structure and transform it into something much larger — without going back and manually duplicating anything.
You access it in the Manage Variations step (click "Manage Variations" at the bottom of the screen after completing the Create Campaign step).
The idea is simple: you build a straightforward base structure (e.g., one campaign, one ad set, 50 ads), and then use "Restructuring" to reshape it into the structure your testing strategy actually requires.
Convert into multiple campaigns:
Toggle: Create campaigns with ___ Ad Sets and ___ Ad(s) each
Example: you have one campaign with one ad set and 50 ads. Turn this on and set it to "1 Ad Set and 1 Ad each" — TheOptimizer explodes it into 50 separate campaigns, each with its own ad set and its own ad. Set it to "1 Ad Set and 5 Ads each" and you get 10 campaigns with 5 ads each.
This is the go-to option when you want full budget isolation per creative — each campaign gets its own budget, eliminating Facebook's delivery bias.
Convert into multiple ad sets:
Toggle: Create Ad Set with ___ Ad(s) for each Ad Set
Example: same starting point — one campaign, one ad set, 50 ads. Turn this on and set it to "1 Ad per Ad Set" — you get one campaign with 50 ad sets, each containing one ad. Set it to "5 Ads per Ad Set" and you get one campaign with 10 ad sets.
This is the go-to option when you want to test creatives in separate ad sets while sharing a campaign-level budget.
Common use cases:
| Scenario | How to auto-explode |
|---|---|
| Test each creative in its own campaign (full budget isolation) | Explode by campaign: 1 Ad Set, 1 Ad each |
| Test each creative in its own ad set (shared campaign budget) | Explode by ad set: 1 Ad per Ad Set |
| Group five creatives per ad set for rotation testing | Explode by ad set: 5 Ads per Ad Set |
| Launch identical structure as separate campaigns per GEO (combined with audience groups) | Explode by campaign with audience groups |
The summary line at the bottom updates in real time: "A total of X Campaign(s), Y Ad Set(s) and Z Ad(s) will be created" — always verify this before proceeding.
💡 Tip: The typical workflow is: build a simple base campaign (one campaign, one ad set, many ads) → upload all your creatives → move to Manage Variations → use auto-explode to fan them out into the structure your testing strategy requires. It takes seconds.
Using Duplication
The third way to generate variations is by manually duplicating items in the left panel tree. Click the three-dot menu (⋯) on any campaign, ad set, or ad and select Duplicate (to copy) or Create New (to start a fresh one).
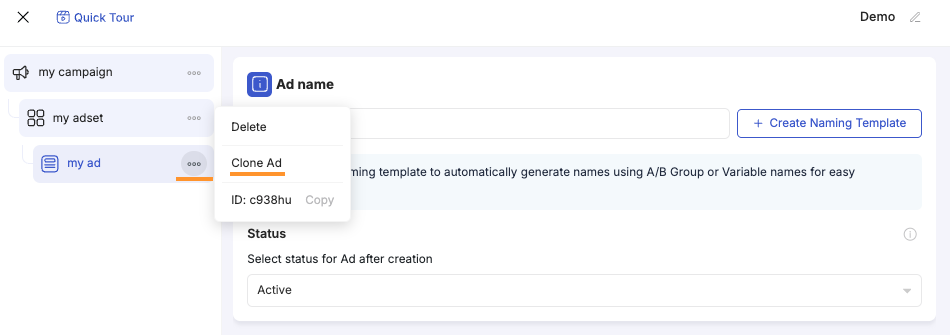
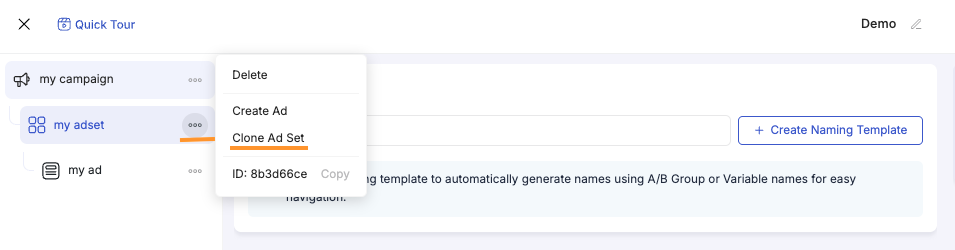
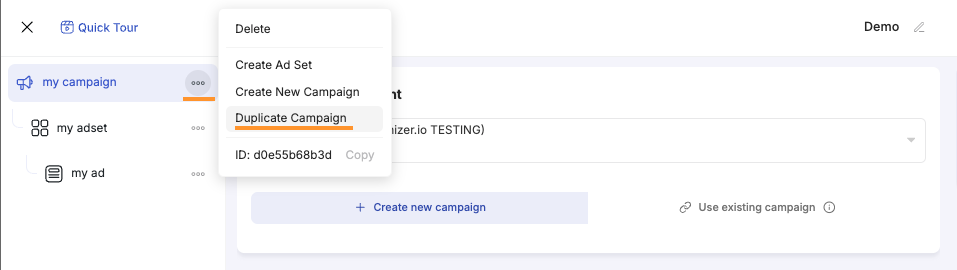
Duplication creates an exact copy of the selected item and everything inside it. You can then click on the copy and modify its settings — different creatives, different destination URLs, different structure.
This is the most manual approach, but it gives you full control over exactly what goes inside each campaign, ad set, or ad.
Groups vs. Restructuring vs. Duplication — When to Use Which
| Method | Best for | Control level |
|---|---|---|
| Groups | Testing combinations of variables (budgets × audiences × placements). You want all permutations generated automatically. | You control the variables; the system generates all combinations |
| Restructuring | Reshaping a simple structure into many campaigns or ad sets. Upload creatives once, then decide how to distribute them. | You control the distribution rule; the system does the splitting |
| Duplication | When you need specific creatives in specific ad sets, or different destination URLs per ad. Full manual control. | You control everything; no automation |
In practice, most workflows use a combination: groups for the variables that can be freely combined, auto-explode to reshape the structure, and duplication for the parts that need manual precision. For example: create a campaign with three audience groups (groups), upload 30 images, explode into one-ad-per-ad-set (auto-explode), then duplicate the entire campaign for a second ad account (duplication + multi-account launch).
6. Multi-Ad Account Launch
If your strategy involves testing the same campaigns across multiple Facebook ad accounts (to diversify delivery, take advantage of the learning phase independently per account, or any other reason), the Campaign Creator supports this natively.
How to do it:
- Build your full campaign structure (including variations, auto-explode, and all settings).
- In the left panel, click the three-dot menu (⋯) on the top-level campaign.
- Click Duplicate. This creates an exact copy of the entire structure — campaign, ad sets, ads, all variation groups, and auto-explode settings.
- Click the duplicated campaign and change the Ad Account to the new account you want to launch in.
- If the new account uses different Facebook Pages, Instagram Accounts, or Pixels, navigate to the ad set and ad levels to update those fields.
- Repeat for as many accounts as needed.
All copies are launched together when you click Publish. Each campaign structure is pushed to its respective ad account, and all operations appear in the Campaign Creation Queue.
ℹ️ Note: If your Facebook Pages, Instagram Accounts, and Pixels are shared across ad accounts, you typically only need to change the ad account selection — everything else carries over automatically.
7. Create Ads Using Existing Posts
When you create a new ad in the Campaign Launcher, the default flow is to upload images or videos and let the system create new ad posts. But if the content you want to run has already been published as a Facebook post — and has accumulated social proof (likes, comments, shares) — you can use that existing post as the ad creative instead of creating a new one.
Why use post IDs: Social proof transfers with the post. An ad running from a post that already has hundreds of comments and reactions performs differently (and often better) than a brand-new post with zero engagement. Using existing post IDs lets you preserve that engagement history across campaigns.
How to Use an Existing Post
At the Ad level, after selecting your Facebook Page and Instagram Account, you will see a selector with two options: Create an ad (the default) and Use an existing post. Select Use an existing post.
Show Image
Two ways to find and add posts:
- Browse posts — opens a searchable panel showing all posts available to the selected ad account. You can search by post ID, message text, or other post elements. The list shows post type (image, video, etc.), whether it is a published or ads post, share count, and creation date.
- Paste a Post ID — if you already know the post ID, paste it directly.
Select one or more posts. Each post selected creates a separate ad — the same way each uploaded image or video creates a separate ad in the standard flow. Set the Call to Action for these ads.
Using Groups with Post IDs
The group mechanism is available in the existing post section as well. This lets you create batches of post-based ads with different settings — for example, one group using "Learn More" as the CTA and another group using "Shop Now". Each group generates its own set of ad variations from the same posts, letting you test CTA performance while preserving the social proof on each post.
8. Upload New Ads or Ad Sets to an Existing Campaign
You can use the Facebook Campaign Launcher to also bulk upload new ad sets or ads to an existing campaign — without touching anything that is already live.
When to use this: You want to expand an active or paused campaign — add fresh creatives to an existing ad set, or launch a new ad set into a campaign that is already running — without rebuilding the campaign from scratch or going through Facebook Ads Manager.
Loading an Existing Campaign
- Open the Facebook Campaign Launcher and select your Ad Account.
- Below the ad account selector, two options appear: + Create new campaign (default) and Use existing campaign. Click Use existing campaign.
- A search box appears. Search for the campaign by name or ID, then click on it from the list.
- Wait for the editor to load. Once loaded, the campaign and all its existing ad sets and ads are visible in the left panel tree.
ℹ️ Note: Everything that already exists in the campaign is read-only — you cannot edit existing ad sets or ads. The lock icon on existing items in the tree makes this clear. You can only add new items.
Adding a New Ad Set
In the left panel, click the three-dot menu (⋯) on the campaign and select Create Ad Set. A new ad set is added to the tree. Configure it as you would when creating a fresh campaign — targeting, budget, placements — then go to the ad level to upload creatives and generate variations.
Adding New Ads to an Existing Ad Set
Click on the existing ad set in the left panel, open its three-dot menu (⋯), and select Create New Ad. From this single ad entity, you can upload multiple creatives and generate variations exactly as you would do when creating a new campaign.
Cloning Instead of Creating from Scratch
If the new ad set or ad you want to add is similar to an existing one, use Clone instead of Create New. Cloning copies all the settings — targeting, placements, ad copy, creatives — which you can then adjust as needed. This is faster than configuring everything from scratch when only a few things are changing.
9. Dynamic Naming Templates
When you are generating dozens or hundreds of variations, naming becomes critical. Dynamic naming templates auto-generate meaningful campaign, ad set, and ad names based on your actual settings — so you never end up with fifty identically named items.
Click + Create Naming Template next to the name field at any level (campaign, ad set, or ad). In the template dialog, click + Add placeholder to insert dynamic values (Targeting, Placement, Budget, Bid Amount, Bid Strategy, and many more), set a Field Separator, and save.
A few placeholders worth knowing about:
Group names insert the name you gave each variation group (e.g., "Budget $25" or "US Audience"). Nested names let you include the ad set name inside the campaign name — the system resolves it automatically.
Incremental index adds an auto-incrementing number (1, 2, 3, ...) to each variation — the simplest way to guarantee unique names.
💡 Tip: At minimum, add an index placeholder to your naming template. This guarantees unique names even if all other settings are identical across variations.
10. Save Your Work as a Template & Reuse
After building a campaign structure — including all groups, auto-explode settings, multi-account copies, naming templates, and automation assignments — you can save the entire configuration as a reusable template.
Click Save in the top-right corner of the launcher. Give the template a name and confirm.
Applying a template: The next time you open the Facebook Campaign Creator, go to the campaign level and check the My Space tab on the right panel. Your saved templates are listed there with an Apply Template button. One click loads the entire structure — campaign settings, ad set configuration, ad setup, groups, auto-explode rules, and automation assignments.
From there, you typically only need to make minor changes: swap in new creatives, adjust a budget, update a destination URL, or change the ad account. The rest is already in place.
💡 Tip: Most media buying teams repeat similar campaign structures daily. Save your first build as a template and every subsequent launch becomes a matter of minutes — even for complex multi-variation, multi-account structures.
11. Automation and Review
The final step before publishing is Add Automation and Review.

Attach Automation Rules
At the top of this step you can attach any existing TheOptimizer automation rules to the campaigns you are about to launch. Select rules from the dropdown or search by name. Multiple rules can be attached at once.
This is important because attached rules start evaluating immediately once the campaigns go live. If you skip this step, you need to remember to go to the Rules section afterward and manually apply your automation logic to the new campaigns — and in the meantime, campaigns may overspend or underperform without the safety nets your rules provide.
General Information
A summary card shows: number of campaigns to be created, total allocated daily budget, number of ad sets, number of ad set variations, audience targeting variations, and number of ads.
Preview Campaign List
A list of every campaign that will be created, showing the campaign name and the structure within it (e.g., "Campaign with (1) Ad Sets and (1) Ads"). Review this list carefully — it is your final check before campaigns are pushed to Facebook.
Publish
Once everything looks correct, click Publish. All campaigns are submitted to the Campaign Creation Queue, where you can monitor their progress. You will also receive email notifications for the status of the operation.
⚠️ Important: If any single item within a campaign fails to be created (even one ad out of many), the entire operation is marked as failed. TheOptimizer does not create partial campaigns. Use the Queue's Retry button if the failure was caused by a transient error, or check the Details to see which specific item caused the issue.
Summary
The Facebook Campaign Creator is designed to make campaign launching faster and more scalable than doing it in Facebook Ads Manager. The key capabilities to remember:
- Familiar flow — the same campaign → ad set → ad structure you already know, with the same settings and options.
- Groups — generate dozens of ad set or ad variations by defining multiple values for budgets, audiences, placements, identities, or creatives. The system creates all permutations automatically.
- Restructuring — build one simple campaign and explode it into hundreds of campaigns or ad sets with a single toggle. Upload creatives once, reshape the structure in seconds.
- Multi-account launch — duplicate your entire setup across multiple ad accounts and publish everything in one go.
- Reusable templates — save your full configuration and reuse it with minimal changes every time you launch.
- Automation at launch — attach rules before campaigns go live so automation kicks in from the first impression.